While I was working my day job I have found that there has been a resurgence in interest in drones and their use of mapping. Being the only GIS person in my company I have been trying to convince everyone that this is a pretty easy win for us. After explaining till my face turned blue I ended up just building something over the past week.
The goal was to see what I could do with open data and see if I could visualize the raster imagery from drones in our application.
In the end the steps were pretty straight forward:
- Get the imagery
- Convert the projection
- Convert to xyz tiles
- Upload to S3
- Update the S3 sharing and Cors policies
- Create the Mapbox map
- Add the Source and Layer to Mapbox
Get the data
For this exercise I will just be using a GeoTiff that I found on DroneDB.
Link to Data - https://hub.dronedb.app/r/odm/aukerman
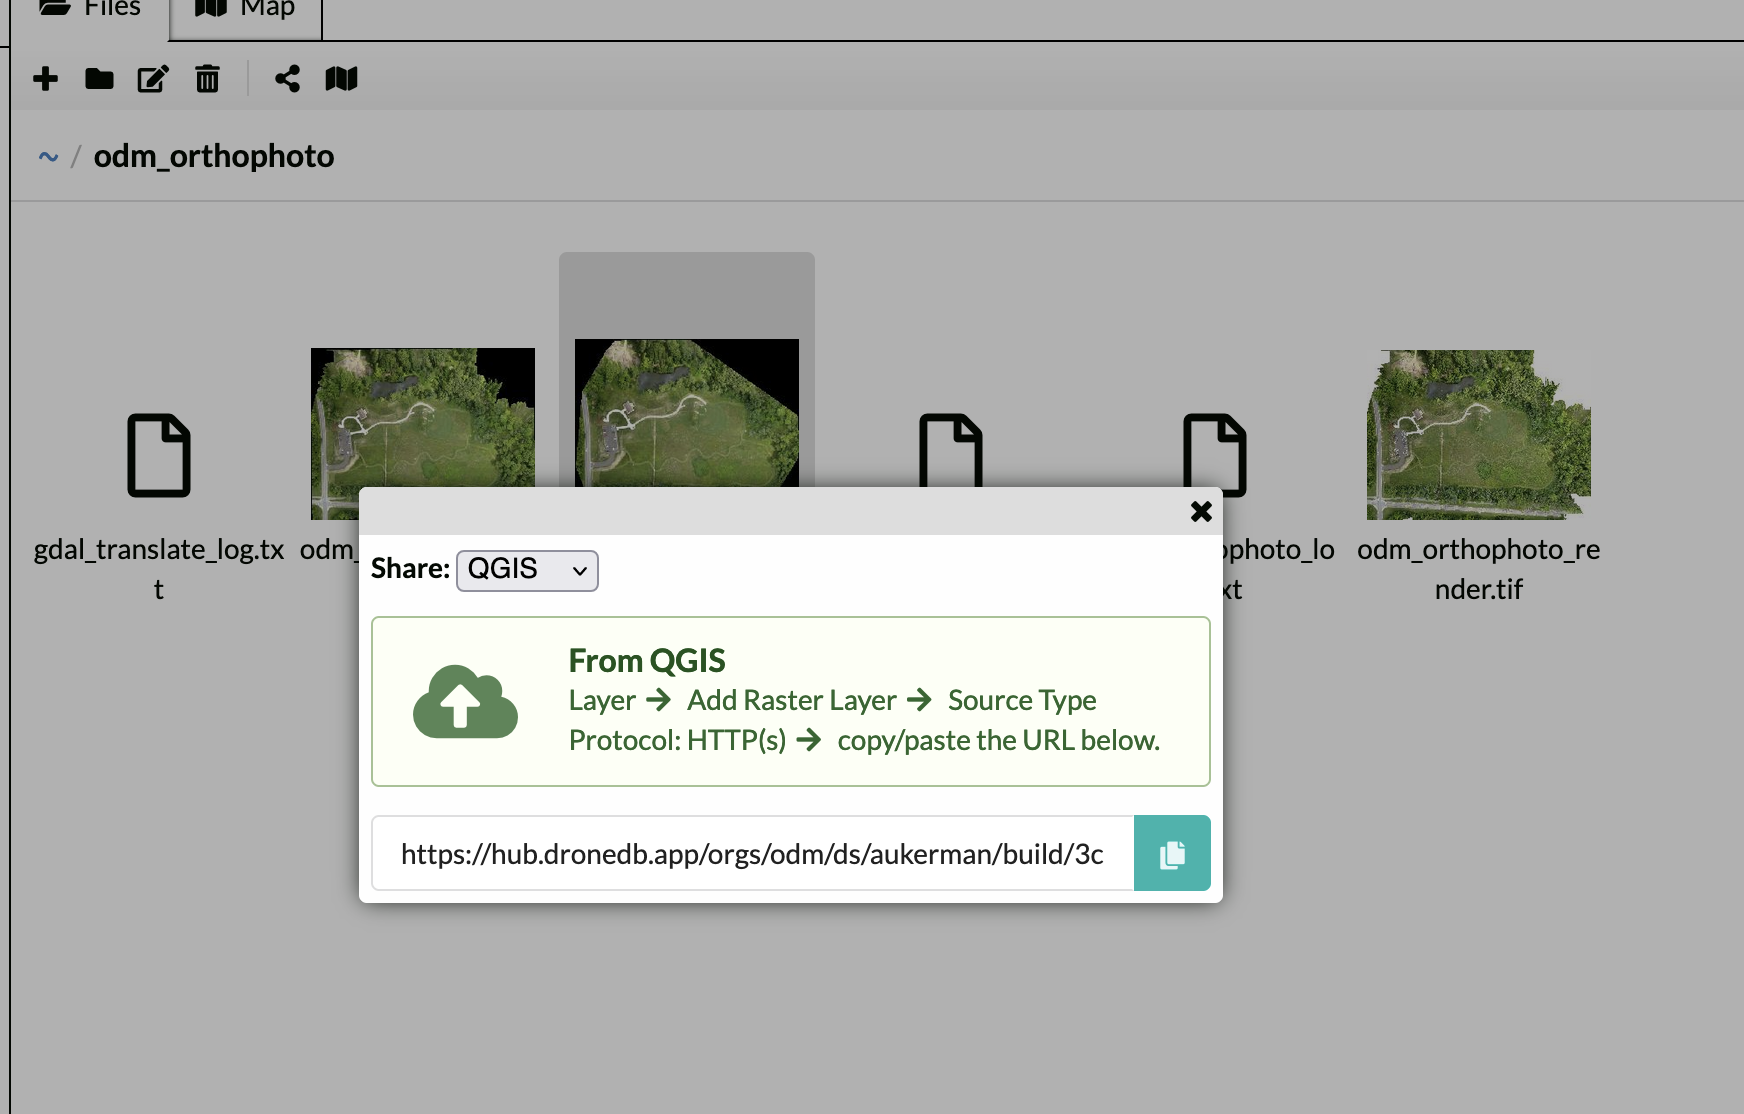
Once you find the Geotiff that you want you just have to right click the image and click “Share/Embed” and then select the qgis option and copy the URI.
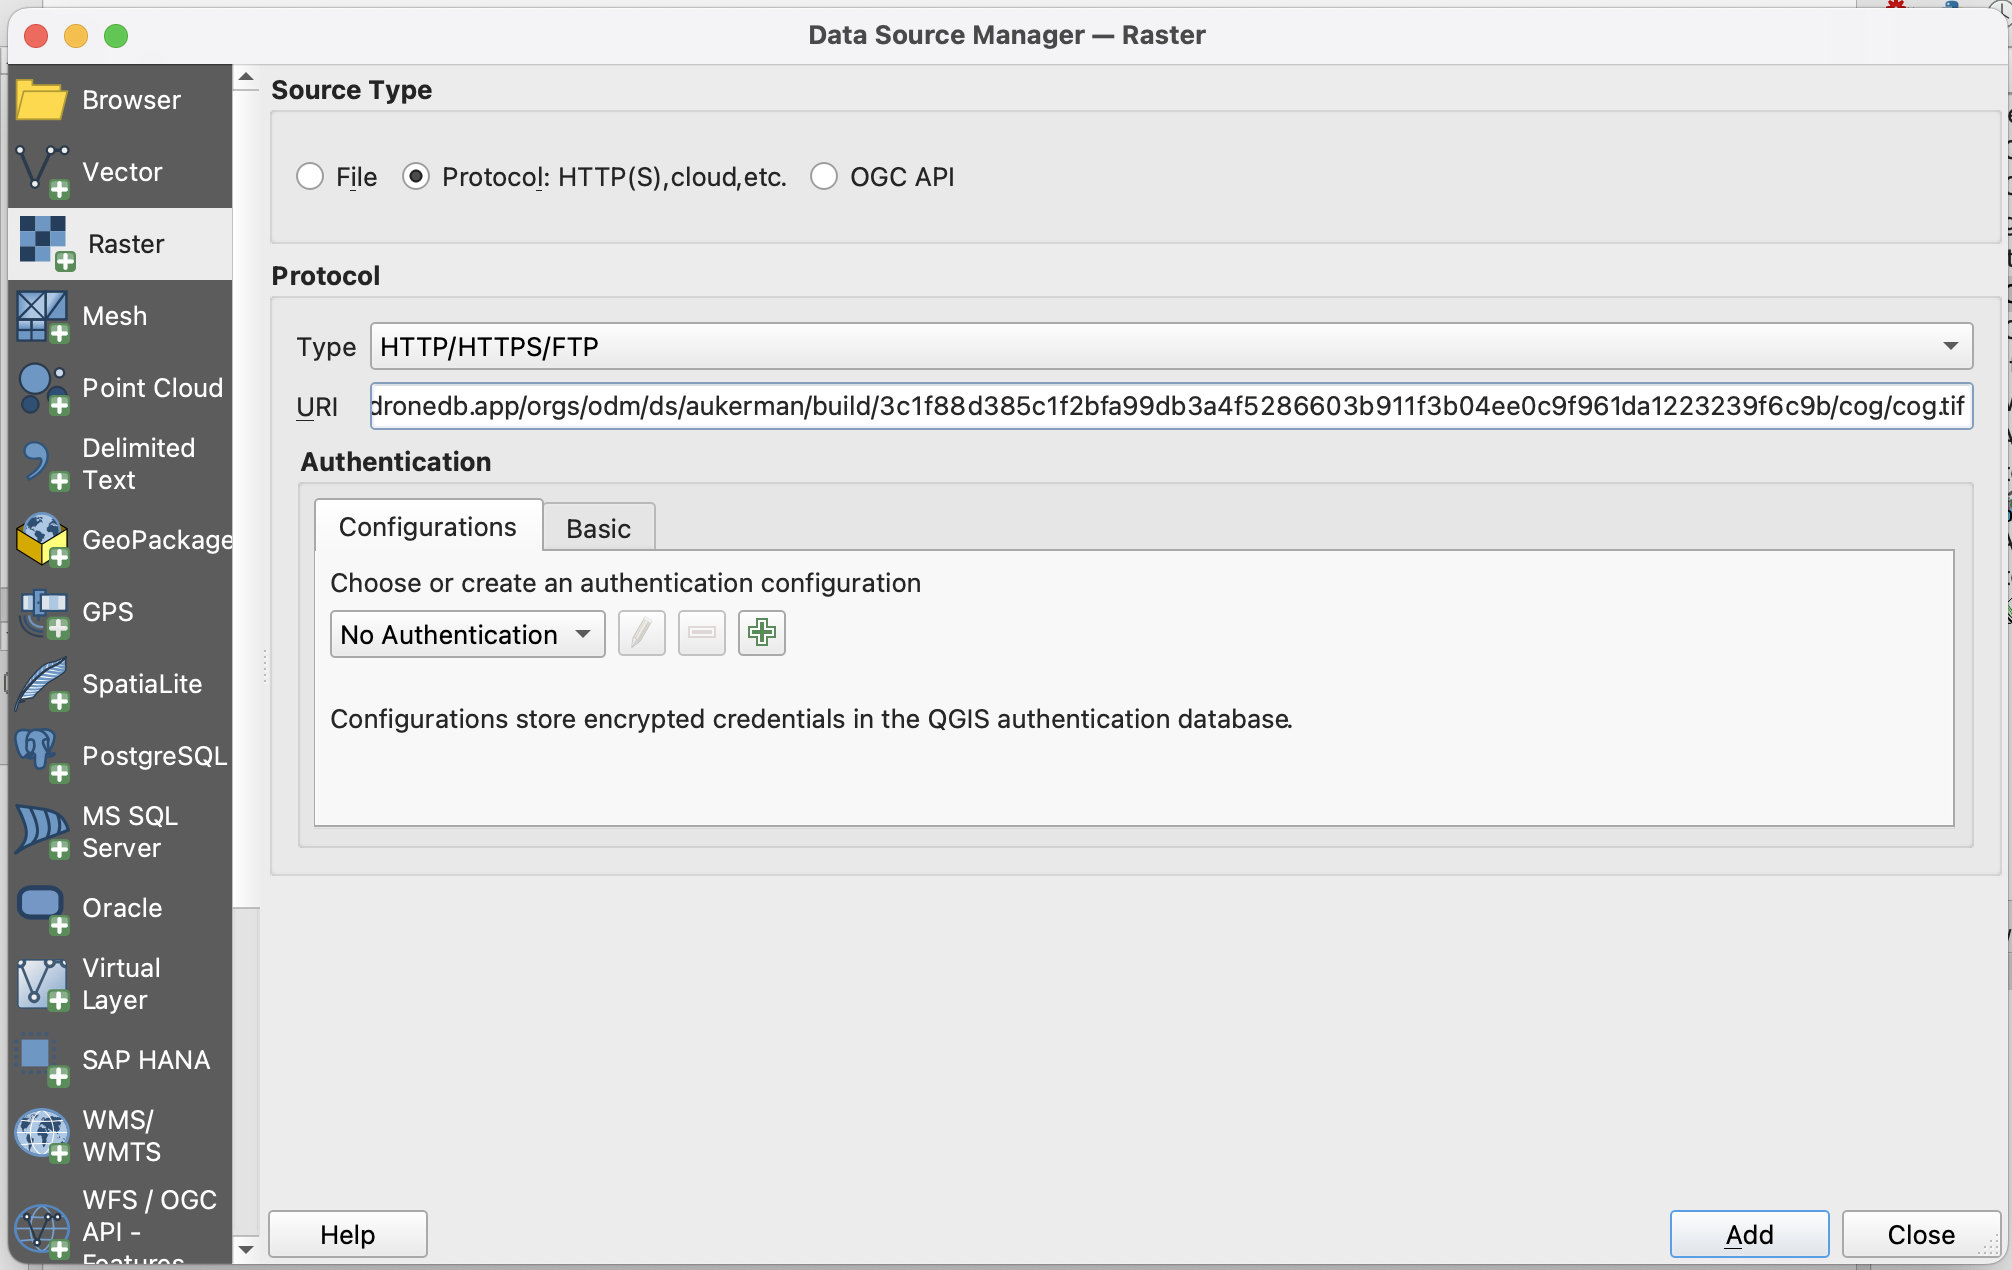
Import the Data
Open up qgis and open the data source manager and select raster, https protocol, and paste in the uri.
Convert the data
Now that the data is imported you need to do 2 things:
-
Update the project projection
-
Convert to tiles
Convert the project projection
You can do this by right clicking the layer in the layers panel and then click layer crs and Set Project CRS from layer. This will make sure that the tiles line up properly when you are loading in mapbox.

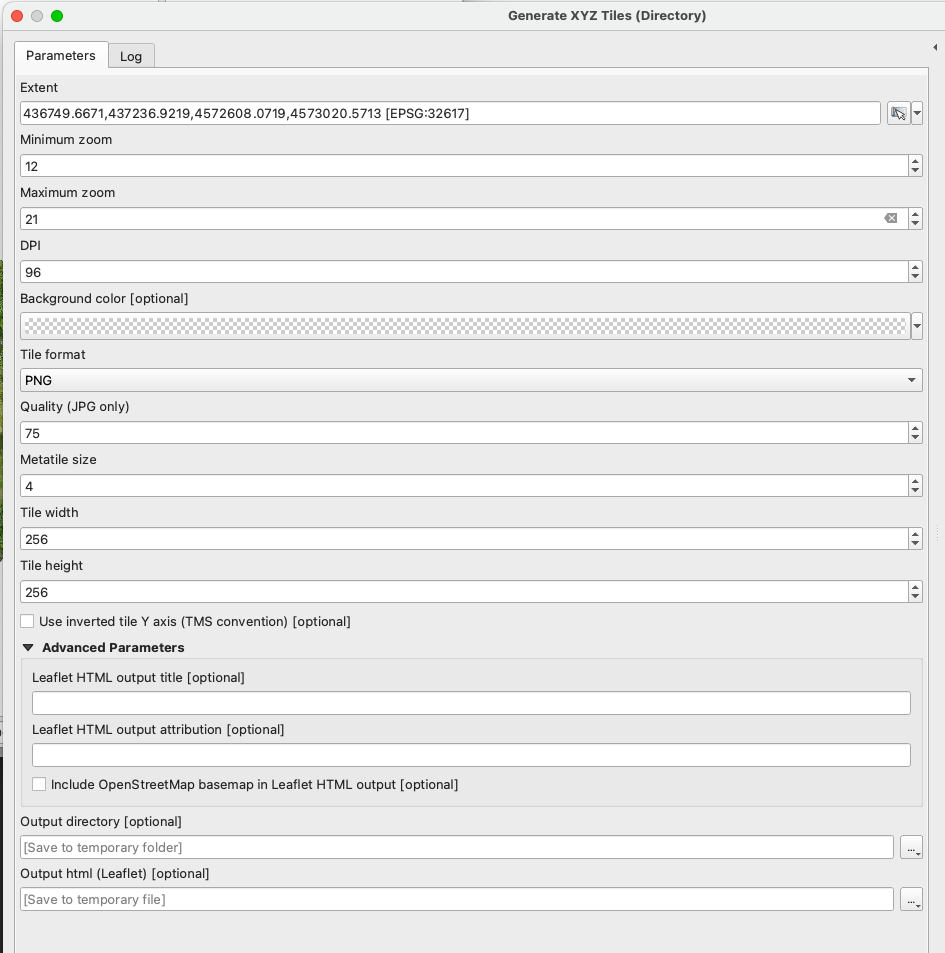
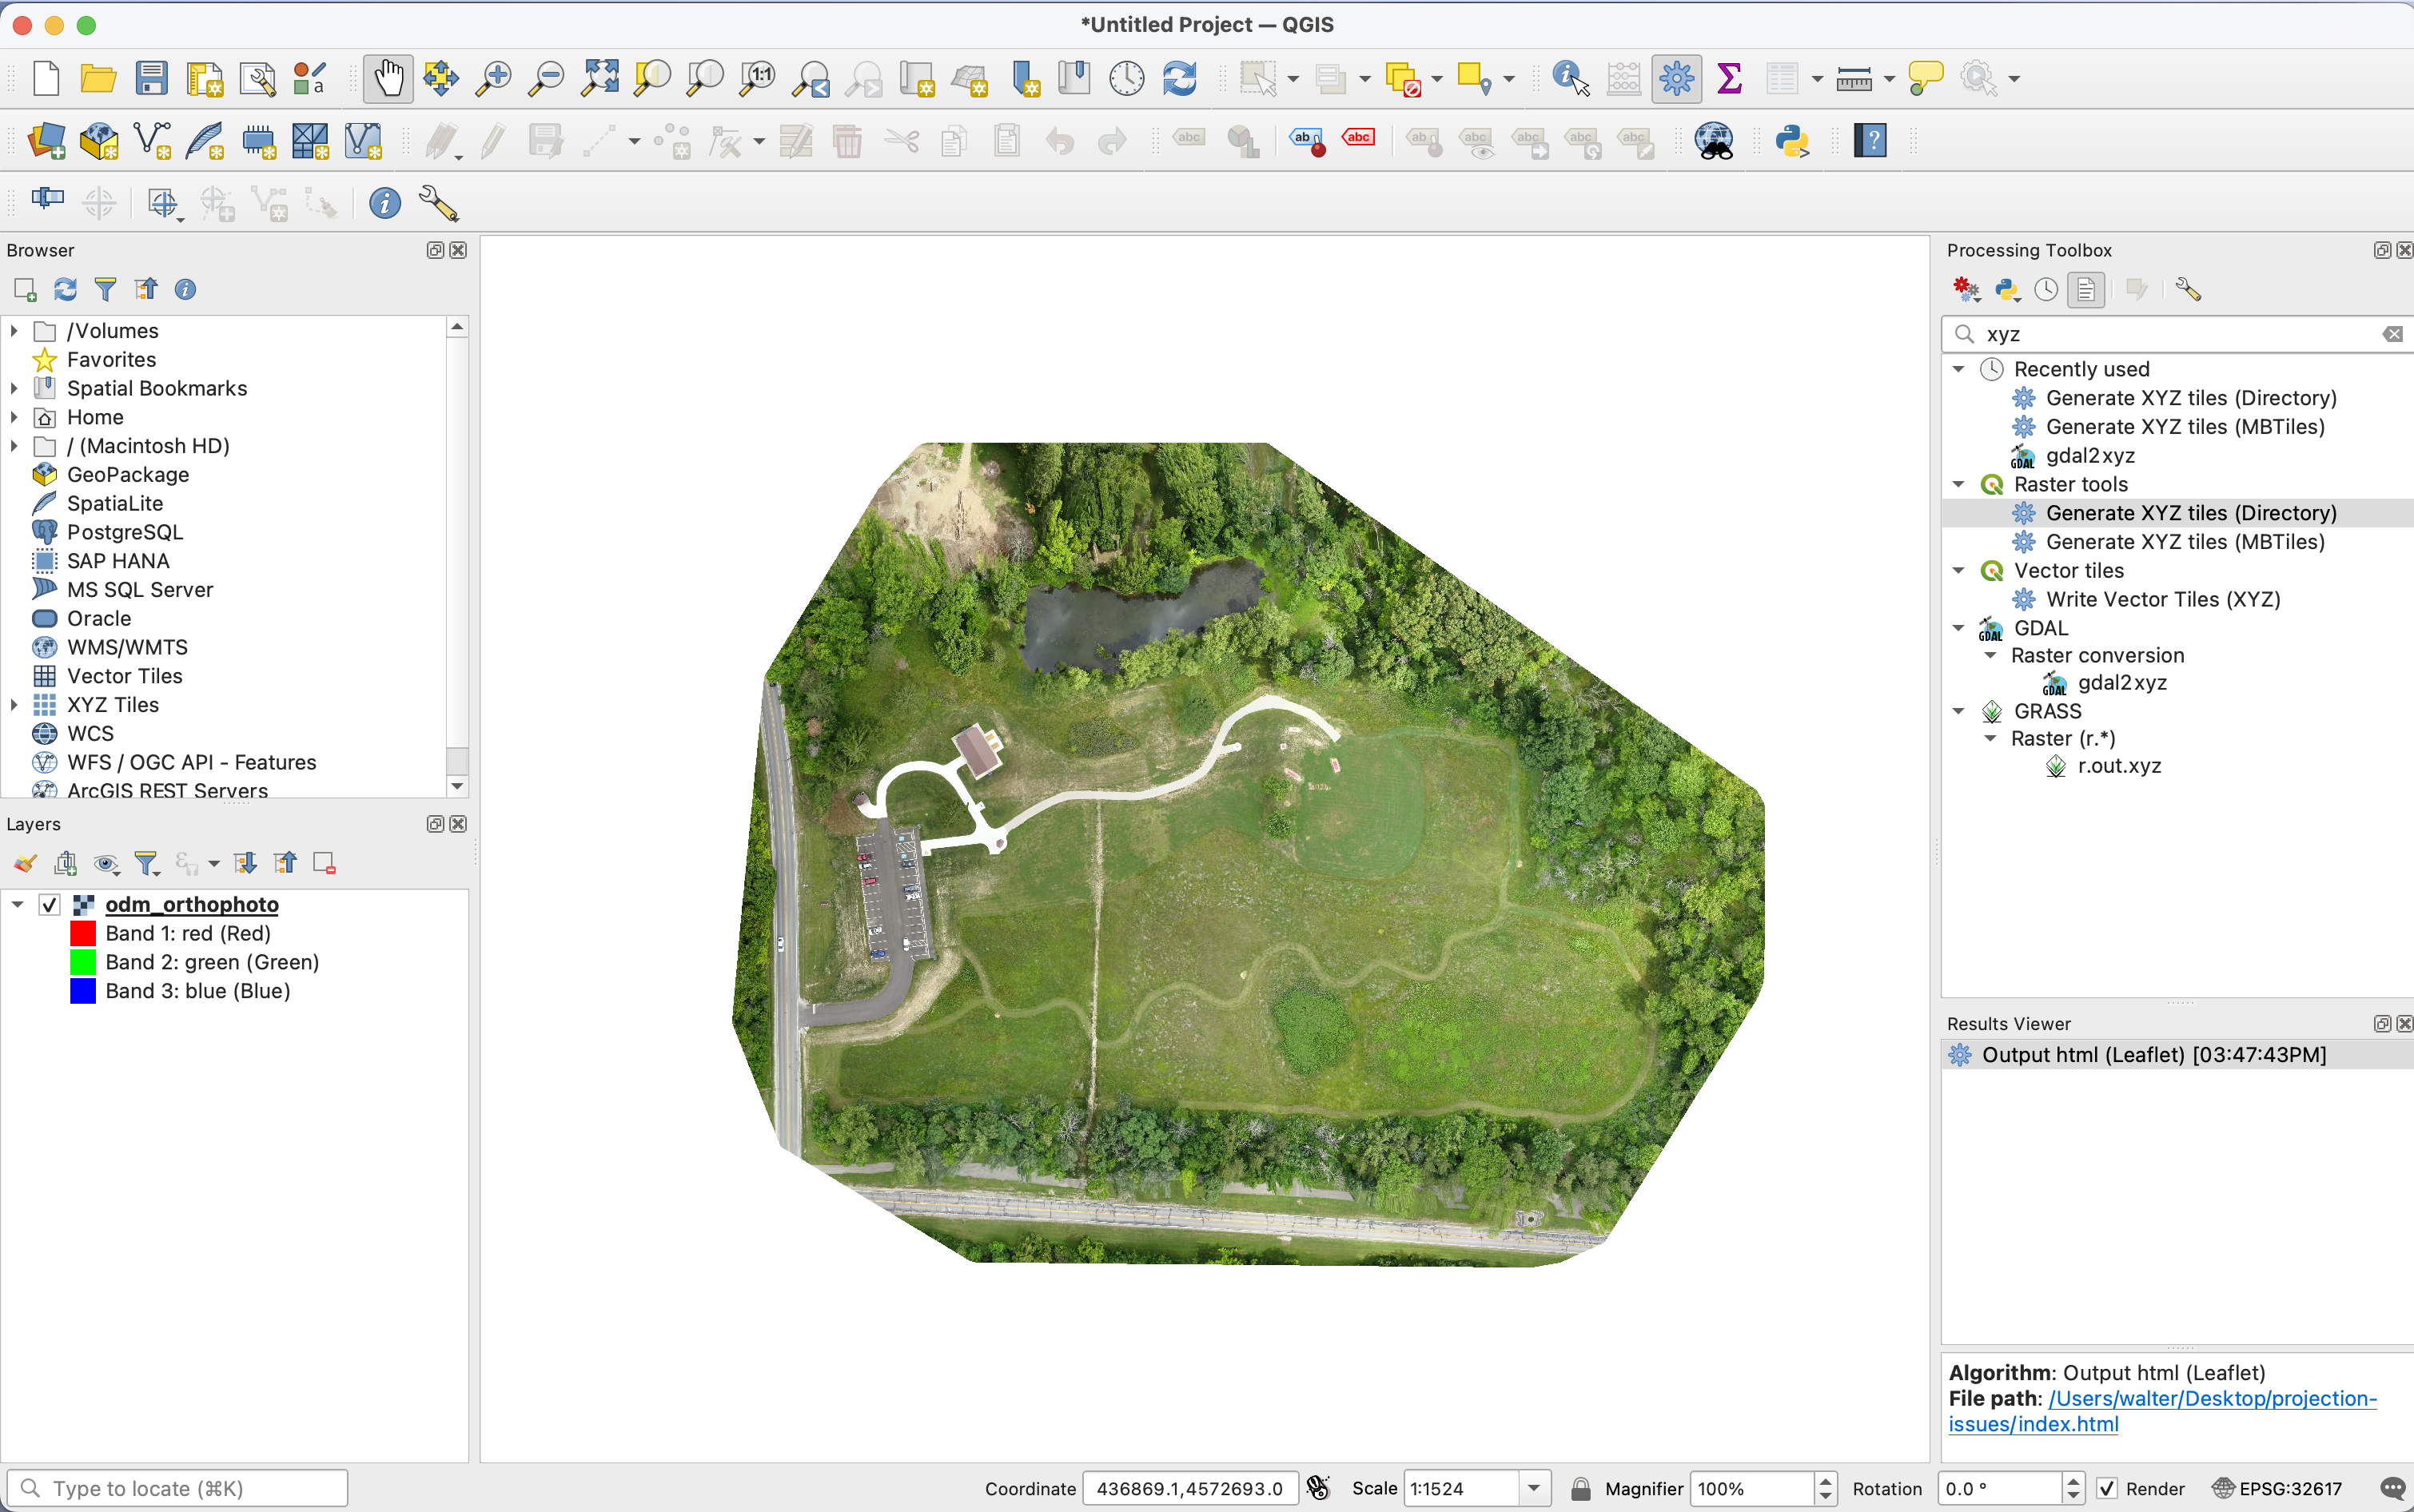
Convert to Tiles
In the geoprocessing tools list you can just search for xyz and select Generate XYZ
Add a bucket
I am not going to go fully into adding a bucket and configuring, but will give you the configs you need for setting up for solving CORS and public hosting files.
Setting the bucket policy
{
    "Version": "2012-10-17",
    "Statement": [
        {
            "Sid": "PublicReadGetObject",
            "Effect": "Allow",
            "Principal": "*",
            "Action": "s3:GetObject",
            "Resource": "arn:aws:s3:::<YOUR BUCKET NAME>/*"
        }
    ]
}
Set the CORS Policy
[
  {
    AllowedHeaders: ["Authorization"],
    AllowedMethods: ["GET"],
    AllowedOrigins: ["*"],
    ExposeHeaders: [],
    MaxAgeSeconds: 3000,
  },
];
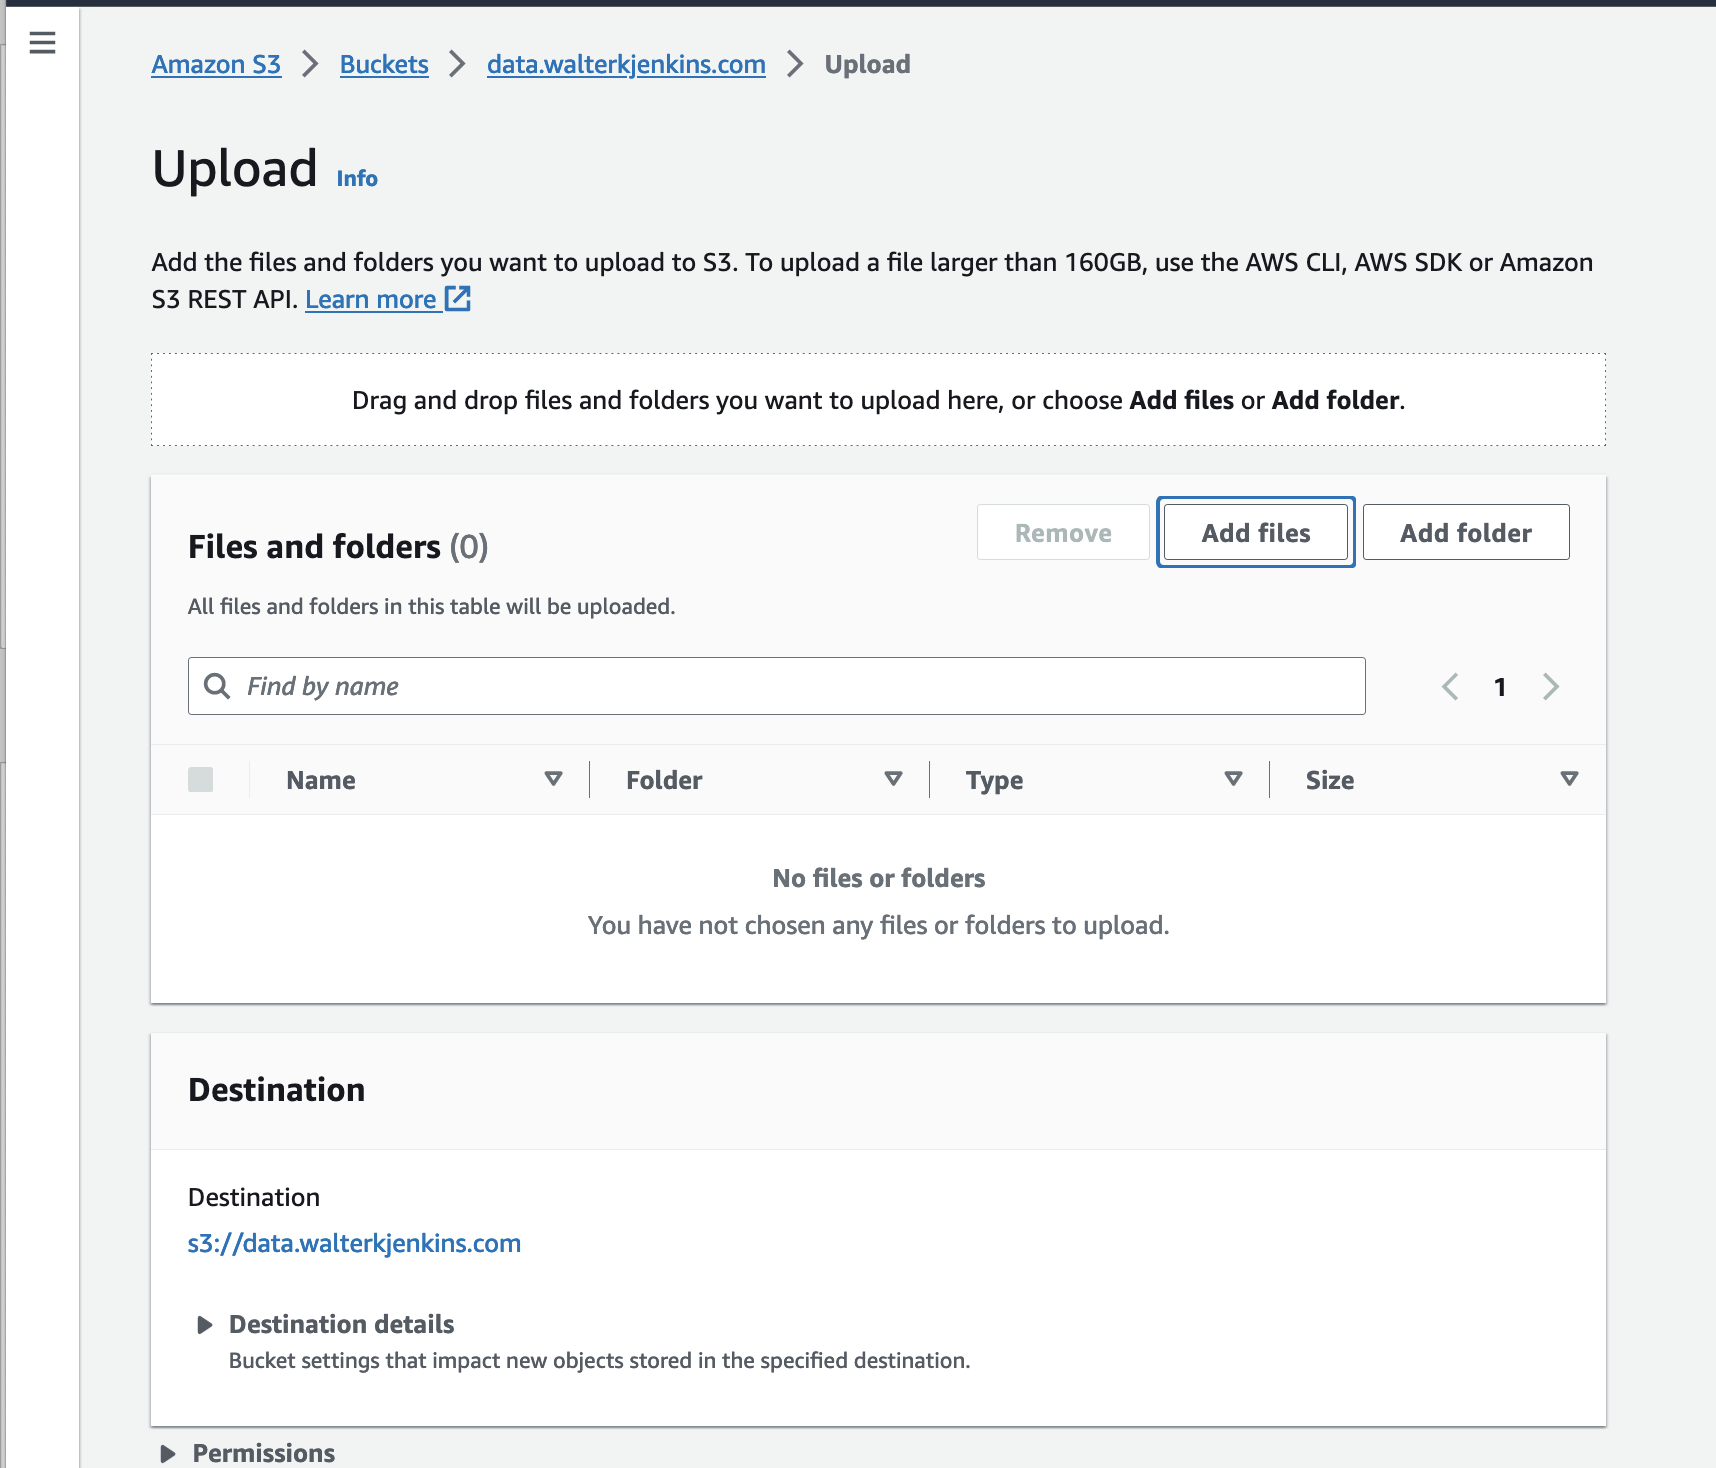
Upload Files
Uploading files to the bucket is easy. In your bucket just select the upload button and then drag and drop all of your folders that were created by qgis over to your bucket.
Setting up Cloudfront (Optional)
In the below linked blog post I talk about setting up Cloudfront so that you can make use of edge locations
Create the app in Vite
We will start with the standard ts react vite app by running npx create-vite-app --template=react-ts. That will create the vite project and we will start adding the files from there.
First we will setup the Mapbox file. This is where all of the logic for mapbox will live.
The first section of the mapbox.tsx file is how we setup the store. This is important because we want to be able to create a hook that allows users to access the Map object in other components.
While I will not be taking the time to explain my work in connecting the store there are some notes on what is happening.
// This is where the store context is kept
export const MapBoxContext = createContext<Map | null>(null);

export const useMapBox = () => {
  const map = useContext(MapBoxContext);
  // this hook should only be allowed to run if it is used within the MapBoxContext Provider
  if (!map) {
    throw new Error("useMap should be used in <Map> child components");
  }
  return map;
};

export const useMapBoxStore = ({
  MAPBOX_API_KEY,
  options,
}: {
  options: Omit<MapboxOptions, "container">;
  MAPBOX_API_KEY: string;
}) => {
  const mapContainerRef = useRef<HTMLDivElement | null>(null);
  const [map, setMap] = useState<Map | null>(null);

  useEffect(() => {
    if (map) {
      if (options.bounds) {
        map.fitBounds(options.bounds, { padding: 20 });
      }
    }
  }, [options.bounds]);

  const initialize = useCallback(() => {
    if (mapContainerRef.current !== null && mapContainerRef.current && !map) {
      mapboxgl.accessToken = MAPBOX_API_KEY;
      const mapImpl = new Map({
        fitBoundsOptions: {
          maxZoom: 18,
          padding: { top: 100, bottom: 100, left: 100, right: 100 },
        },
        style: "mapbox://styles/mapbox/navigation-night-v1", // style URL
        ...options,
        container: mapContainerRef.current,
      });
      setMap(mapImpl);
    }
  }, [mapContainerRef, map, options]);

  useEffectOnce(initialize);

  return { mapContainerRef: mapContainerRef, map };
};
Create the MapComponent
The MapComponent is where we are declaring the MapBoxProvider will live. It takes in a couple of different props that help the map load:
- children - All of the items that live within that component and have access to the mapbox hook
- MAPBOX_API_KEY - this is the key that lives on the env that allows you to render the mapbox map
- options - these are the mapbox initial options (parameters) that you are passing to the
new Map()that renders the map. they allow you on load to tell the map where and how to render the map - className - this is just the classNames that you want to add to the map to style with css.
export const MapComponent = ({
  children,
  MAPBOX_API_KEY,
  options,
  className,
}: {
  children?: ReactNode;
  MAPBOX_API_KEY: string;
  options: Partial<MapboxOptions>;
  className: string;
}) => {
  const { map, mapContainerRef } = useMapBoxStore({
    MAPBOX_API_KEY,
    options,
  });

  return (
    <MapBoxContext.Provider value={map}>
      <div ref={mapContainerRef} className={className}></div>
      {!!map && children}
    </MapBoxContext.Provider>
  );
};
Drone Layer
Lastly in the mapbox file we will add the drone layer. This is just following the RasterSource and RasterLayerOptions in the Mapbox api to first setup the source and then set a layer to that source and how to display it.
Note that the .env variable that is setup in here is the bucket or cloudfront enpoint that you have setup.
export function DroneLayer() {
  const map = useMapBox();
  useEffect(() => {
    try {
      // @ts-expect-error
      const env = import.meta.env;
      // This should only run once the mapbox component is done loading all of the styles
      map.once("styledata", function () {
        map.addSource("drone-imagery", {
          type: "raster",
          tiles: [`${env.VITE_APP_S3BUCKET_URL}/s3-tiles/{z}/{x}/{y}.png`],
          // tileSize: 256,
        });
        map.addLayer({
          id: "radar-layer",
          type: "raster",
          source: "drone-imagery",
          paint: {
            "raster-fade-duration": 0,
          },
        });
        console.log("add imagery");
      });
    } catch (e) {
      console.error(e);
    }
    return () => {
      map.removeSource("drone-imagery");
    };
  }, [map]);
  return null;
}
Display the map
In the App.tsx you need to render the map. so you would just replace the code with something like this.
import React from "react";
import "./App.css";
import "mapbox-gl/dist/mapbox-gl.css";
import { DroneLayer, MapComponent } from "./components/mapbox";

// @ts-expect-error
const env = import.meta.env;

function App() {
  return (
    <div className="App">
      <header className="App-header">
        <MapComponent
          className="map"
          MAPBOX_API_KEY={env.VITE_APP_MAPBOX_API_KEY}
          options={{ center: [-81.7528142, 41.3040475], zoom: 16 }}
        >
          <DroneLayer />
        </MapComponent>
      </header>
    </div>
  );
}

export default App;
Final Product
And you’re done! You have a mapbox map with some custom drone imagery. You could run this same code with your own drone imagery if you have some and wow your friends and clients.